
Pink Silk Butterflies
I feel lucky that at an early age my grandmother introduced me to fiber arts. I have known it for so long, in some ways the fiber arts feels part of me. The woman I looked up to when growing up had a passion for knitting, weaving and spinning. I loved all the work she did, but I never saw myself in what she was doing. Then I took a class in wet & nuno felting and a spark that was deep in me was awoken. But starting the first square of Grandma’s Butterflies had a heavy weight on me. Would it be good enough in my grandmother’s eyes? I have a legacy to live up to. But my grandmother would have loved to touch the soft silk surface on the Pink Silk Butterflies square. She would have been fascinated at the butterfly shapes. I can imagine her lifting her glasses and looking closely at the square. Of course, with a huge smile on her face the hole time. She would have wanted to know all the details about it and sat fascinated with me telling her the stories of saving the piece from different obstacles.
But she wasn’t alive when the piece was done so I am moving this forward instead of backwards. I am telling all of you the stories behind the piece. The stress and tears of all these squares. The pressure I put on myself to succeed. But also, the joy of looking at the pieces now and seeing the real beauty to them that I could not see at the time. My grandmother always had a story about a piece she did that you would find out about years later. She would see it and laugh with whatever happened. I think she would understand exactly how I feel today about them and would enjoy the back story you are about to read.


Technique Behind the Piece
My first square – Pink Silk Butterflies – was a high stakes piece. In my search for materials I was only able to find one piece of china silk. It was a baby blanket that was the exact size needed. I only had one shot at making this square because I would not find another piece of china silk in time and I knew this technique would have been something she truly loved. It is simple and unique. The three butterflies are formed through the surface design technique of nuno inclusion with china silk. The technique uses the silk to trap an inclusion on the surface of the felt. The silk’s momme (weight) determines how the silk will transform the surface of the felted piece. In this case, using a piece of china silk (heavier than silk gauze) cut to the size of the square, I created a repeating pattern across the entire piece. I used cotton quilt batting, cut with my butterfly stencil, as a resist inclusion. Its purpose is to prevent the wool from felting into the china silk and to raise the shape from the base of the piece. These cotton quilt batting cutouts are what forms the shape of the butterflies in this square.

Pink china silk laid on top to trap the trio of cotton quilt batting butterfly cutouts.
Because this square was so simple with its design, I wanted to add contrast with a type of surface alteration – surface stitching. I love surface stitching because it’s simple to do and allows you to add detail to your piece easily. The design from the stitching remains but the yarn itself felts into the base giving nothing other than the color difference for the viewer to see, creating what looks like something drawn onto the surface. For this piece I looked up basic embroidery stitches. I will admit that embroidery is not something I excel at unfortunately, so I wanted to keep is simple. I chose French Knots which were not that simple to me in the end. This part of the square would become my biggest challenge. Funny because it’s a small part visually of the piece. I chose a dark blue non-pre-wash wool yarn to add a contrast against the pink base. It also helped connect the piece to the Butterflies Flapping square (next week’s post) because that square also used that dark blue wool yarn to contrast against the pink background of one of the butterflies.

Silk not tight to the wool because it separated while handling during embroidering French knots.
Like many felt pieces, this square had to be done in stages. Stage one, create the base of the square with four layers of commercially mixed gray merino wool. (I define a layer in my pieces as laying out wool horizontally and then on top of it lay out vertically.) Then place three-cutout cotton quilt batting butterflies and trap them with pink china silk. After the silk is added I placed a piece of bubble wrap on top and began to rub the piece that was soaked in soapy water with my hands. Next, I used a palm washboard felting tool, paying special attention to moving it around the butterfly cutouts like I did with my hands. Finally, a hand sander to get the piece to the prefelt stage. I let it dry overnight so I could embroider it the next day. If I could go back, I would have rolled it 100 times to really make sure it was pre-felted.
While I was struggling to stitch in the French knots the silk piece began to separate from the wool. As you can see in the picture above, the pink china silk is loosely sitting on top of the base. The bottom butterfly is starting to lose its shape because the wool is no long holding the silk around the resist inclusion tightly. If you look closely you see that the silk piece is hanging over the edge instead of being held tightly along the bottom edge. I had not allowed the wool to grab enough of the silk piece causing it to separate when I was handling it.
After rolling the square 400 times.
Since I had started the felting process the night before the scales on the wool had opened and began to interlock with each other while grabbing the silk in the process. Only the wool shrinks down, and the silk instead is caught in the interlocking wool. But if it separates, as it did here, I was left with a 20x20 inch piece of china silk, but the wool base was now smaller and let go of the silk. So, when I continued the felting process after the stitching was competed, I should have measured the base and trimmed the silk to match its size when dried. That would have saved me hours of problem-solving as I moved onto finishing the piece. I ended up with a baggy cover making it hard for the wool to reach through the silk. If it can’t reach and pass through the silk the wool will not interlock and form a new type of textile. However, if I had made the sizes match again the silk would have continued to be tight to the wool when I rewet it and moved forward.

Beginning to shrink during the fulling process.
But I didn’t trim it down right away so as I was moving through the process the silk peeled off and fell over the edge causing the silk to be difficult for the wool to capture. To save the piece I continued to trim it down and added stitches to force the silk to sit tightly on top of the wool base. Adding some stitches is a common method in nuno felting to use when you are having difficulty getting your fabric or overlay to stick. If you use a closely colored thread to whatever you are stitching it in, it will disappear into the wool and not be noticed. Passing on one major lesson here, if after you started fulling the piece you realize you did not prefelt far enough stop early and trim it, then the overlay stays tight to the surface. Pay special attention to the edges to ensure the silk is being grabbed by the wool across the entire piece.

After agitating it down to 12X12 inch square and drying overnight to finish the fulling process.
Regardless, it’s still a beautiful piece but you can see in its corners that there were problems with sticking, so the silk is loser there. But that just gives a little character in the end. I said in the last post that I created four squares that were complete failures. It is very challenging, at least for me, to get the silk to stick to the wool. You must have the right momme of silk for it to work. I have a lot of materials in my studio that have been collected at thrift stores to use for upcycling. I love reusing fabric and giving it a new life! However, I thought some of the pieces were the right momme of silk and would work, but they did not because their weight was too heavy for the wool to cross through. Talking through these problems hopefully helps you. I know I have read quite a few blogs about how to fix felting issues.

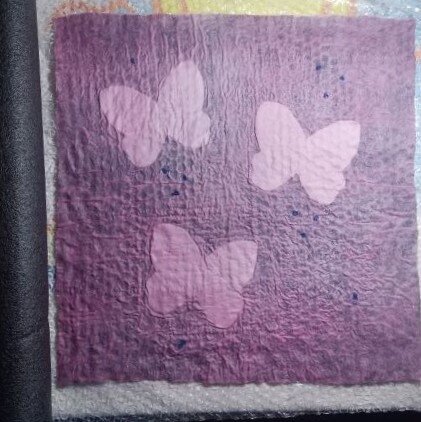
Completed Piece
The china silk in this piece did work but I did have some issues to work through in the process. In the end the china silk overtakes the piece because it does not disappear into the wool the way gauze would. This nuno technique crates an entirely new textile when complete. You don’t really see the wool at all at the end. Instead you get a grayed pink textured surface with perfectly pink butterflies that stand out because the resist inclusion prevented the wool from passing through.
Housekeeping
This is the first of four installments on the individual squares to my award-winning piece – Grandma’s Butterflies. I am going to release them in the order they were created. Check back next week to read about Wings Flapping. In that square I used the technique of pop-out prefelts. I had a lot of fun making that square.
Make sure to follow me on Facebook, Pinterest or Instagram to get my behind-the-scenes posts that take you into my studio. Also, please leave comments or questions below or on any of my social media channels. I want to hear from you and get a discussion going.


