
Brown Marble Bag
This is the final post to season one of my blog! It has been an emotional journey writing about the pieces I entered in The Golden Web Show, my first fiber arts exhibit. The show was put on by the Weavers Guild of Buffalo (WGB) in celebration of their 50-year anniversary. They were my late grandmother’s guild and currently my mom and I’s guild. It was personal and emotional for me as I wrote in Tribute to a Master Fiberist, My Grandma. I also spent a lot of time writing about my piece Grandma’s Butterflies which was a tribute to my grandmother. Each square – Pink Silk Butterflies, Darkened Butterflies, Wings Flapping, Blue Cotton Butterflies - in that piece combined two or three different surface design techniques learned from Fiona Duthie’s, (a fiber artist from British Columbia) online surface design class. Understanding the role my grandmother played in exposing me to the fiber arts gives you some context on the source of my passion. But, these final two pieces entered to the show come from my own fiber artist ambitions – felted bags.
My Brown Marble Bag won the novice award at The Golden Web Show which was a juried show with an independent judge who was looking for skills in technique. This was the third award announced on opening night. My mother thought I would win the novice award, but I just thought she had “mom eyes.” Of course, my mother would love the art project I brought home, she loved them all regardless of how they looked. But she was right. After they called my name, she turned to me and exclaimed “I knew you would win the novice award!” When we discussed it after the opening was over, she said that she could see I had a natural talent in felting. She was right, it is an art form that just clicks for me and has given me a tool to express my creative side.

Displayed at The Golden Web Show.
I was not going to enter this bag because it was such an early piece and I had developed so many more complex techniques since its creation. The novice award recognizes talent in those who are new to the work, in my case, wet felting. This bag was a great piece for the novice award because it was an early piece done before I had any training beyond my first class with Dawn Edwards at the Eastern Great Lakes Fiber Conference. There I took her classes on making felted hats and fascinators. Shortly after I came home from the conference I bought a book of bag patterns on Etsy and challenged myself to go through and make all the patterns as a way to teach myself how to make bags through the resist technique. I ended up making only four out of six of the patterns because starting the surface design class with Fiona Duthie put me on a different trajectory in my development of this skill. As you continue to read, you will learn about the different techniques used in this bag. You will understand at the end why the judge awarded this bag the novice award.
I am fascinated with turning a two-dimensional object into a three-dimensional bag. Currently I’m taking Fiona Duthie’s online class on felt bags. More to come in season two of Lillian Russell Designs blog. Being such an early piece, I had not really developed my routine for documenting the progression of a project yet so there are not many pictures except for the picture below. I was so fascinated by the felting over the edge technique on the flap that I had to take a picture after I had finished laying it out to send to my mom. At the time I felt that my work was starting to get good and that bags would be my signature pieces.

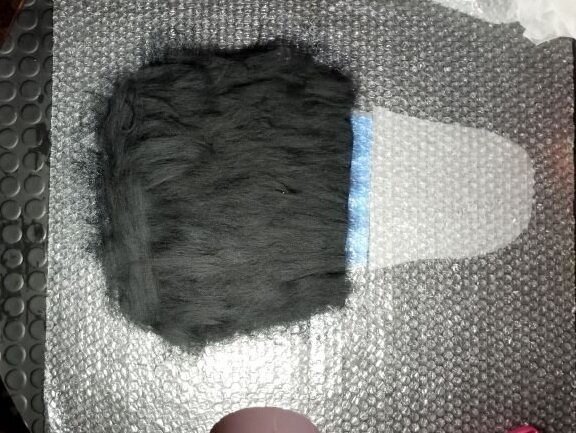
Brown marble bag laid out with the orange fringe trapped between layers of the flap.
This bag is created with commercially dyed and mixed brown marble merino wool top for the outside and flap layers, commercially dyed brown merino wool top for the inside layers, and a small quantity of commercially dyed orange felting curly wool for fringe. To make a felt bag strong enough it needs four layers of wool. You lay down the wool horizontally for the first layer and the second layer is laid at a 90-degree angle (vertically). Being a small bag, merino wool would work but when you get to larger bags you use slower felting wool. More on that to come after the break. What is interesting about laying out four layers of wool is that the first two layers create the inside of the bag and the last two creates the outside of the bag. You can choose one color for the inside and another color for the outside of the bag. You can use complimentary colors or like what I did I used colors of the same family – brown. I did this to extend how much I could get from the marble mix. I had a large quantity of the brown merino wool but a smaller amount of the mix.

Bag and flap resist under bubble wrap to serve as outlines for laying down the wool.
To make a seamless bag you wet felt with the resist technique. I also used resists to form the butterflies in the Wings Flapping square. A resist is made from material like the installation used with laminate floors. It needs to be an impermeable material that can withstand water. Following the instructions in the book I cut out the shape of the bag and then cut out the shape of the flap from the insulation I had from my mom. Since I did not have many pictures of the bag's creation, I made a new bag for demonstration. The following pictures are of the new bag that included some surface design techniques that the original did not have. But I had to bring all the learnings together in this new piece. To start I took the resists and laid them under the bubble wrap. I laid the wool across the base of the bag resist making sure to go over the edges by about an inch or so. That wool will be folded over the resist when it is placed down on it.


You lay out the four layers which makes the back of your bag. For the example I only used black merino wool so it’s not easy to tell the different layers, but you would lay the outside layers first and then the inside layers. After the layers are down you place a small resist on the back interior of the bag to create a pocket. You then lay two perpendicular layers on top of the pocket resist making sure to place it over the right, left, and bottom of the resist by about an inch or so. This binds the pocket to the inside of the bag. You also leave a small area uncovered on the top of the resist so that the resist is sticking out of the pocket. You can see how you lay the pocket out in the pictures below. After the pocket has been laid out you pull the bag resist, that was under the bubble wrap serving as your guide and place it on top of the wool. Like with the pocket, you want to leave space with no wool at the top of the resist. That forms the entry to the inside of the bag. If you covered the entire resist with wool, you would need to cut the top of the bag open during the fulling process.

Pocket resist on backside of bag.

Two layers wool over resist.
With the resist in place you lay the four perpendicular layers of wool down for the front of the bag. This time you start with the interior layers first and finish with the outside layers. After I am done with laying out the base of the bag, I lay a piece of bubble wrap on top and rub the bag. I just need the wool to stick together enough that I can flip the bag over. You will see in the picture below; the bag has been flipped over and now the shape of the flap can be seen under the bubble wrap to serve as my guild. With the flap, unlike with the base of the bag, you want to keep the wool within the lines of the pattern. But you also, need to lay out the wool about three inches over the backside of the base to attach the flap to the bag.

Starting three inches onto the base to connect.

Four layers of wool laid out for flap.
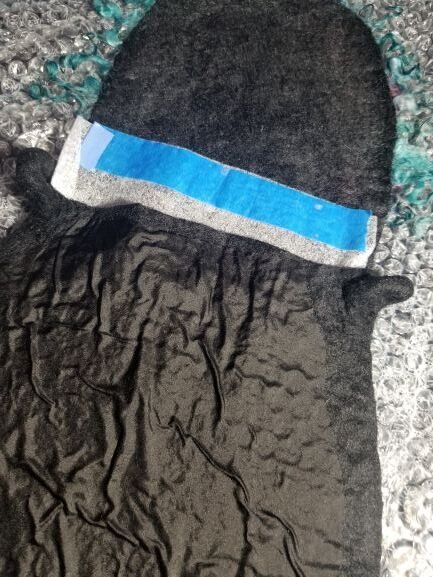
To create the fringe on the flap you start by laying down only two layers of the wool perpendicularly. You now have the underside of the flap down and you want to take the orange felting curly wool and spread out the wool on one side of the lock. You leave the beautiful curl alone because you want that to stay as is, but the base will be spread out like a fan so that it can be felted into the flap. After you have carefully laid out the fringe you add the last two layers of wool on top. Now, through an over the edge technique that uses layering to trap the orange felting curly wool, you leave the curls on the outside of the flap and not allow it to be felted into the flap. You must now be careful with the curly wool locks because you don’t want them to be felted into something or themselves.


After the flap is laid out you have a multi-layered wool bag that you must spend a good deal of time rubbing with a layer of bubble wrap put over the top. You want to make sure to get the fibers to migrate through each other. After you feel the wool has really begun to combine you roll it watching to see how the resist is laying. The resist will begin to fold up as the bag shrinks around it. Once it appears that the resist is no use any longer you pull it out. After you have rolled the outside of the bag and the resist is out you carefully turn the bag inside out. You will see that the wool inside is not as combined as the outside of the bag. With the bag turned inside out you begin rolling it again exactly like you did before and see the inside of the bag begin to be felted and start to look combined. After the felt has really come together you turn it right-side out and begin the fulling process.


You want to spend a lot of time on the fulling because you want to maximize the shrinkage which helps strengthen the bag. When the fulling is done you rinse the bag and stretch it out. You then take the bag and stuff it, I use bubble wrap to stuff inside, to shape the bag. Let it dry overnight with its stuffing. Once the bag is dried you can add a strap and bag hardware. For the original bag, the fold over flap had a magnetic clasp hand sewn on to allow for closure. I also added a small button on the inside pocket with a hole cut into the pocket for closure. Its more cute than practical. You will see with the new bag I have added loops to the base of the bag to connect the strap. This is a new technique I just learned. I will go into that more in future posts.

Resist has been removed and the base of the bag turned inside out. Ready to be rolled again before fulling.
Housekeeping
This post concludes the first season of Lillian Russell Designs blog about a novice felter’s exploration of technique. This season was filled with personal stories about my family and what the fiber arts mean to me. I had a lot of fun writing these posts and they really served as a great way to put closure to the loss of my grandmother. She was one of the most important people in my life and is greatly missed by me and the whole family. I hope for others the trials and tribulations will help them when they are facing the same problems in their felting work. With the loop addition, I can tell you that everyone in the class had a hard time with the technique. It was nice to not feel alone in my struggles. If I can bring you nothing else, I hope you walk away knowing you are not alone in your exploration.
I need to work on new material for my blog and some of it will likely be pieces I give my family for Christmas so I cannot post about them until after the holidays. Lillian Russell Designs blog will be back in the spring with more stories.
Make sure to follow me on Facebook, Pinterest or Instagram to get my behind-the-scenes posts that take you into my studio. I will continue to post during the break. Also, please leave comments or questions below or on any of my social media channels. I want to hear from you and get a discussion going.


