
Pointy Flap Bag
My second entry for Weaver’s Guild of Buffalo's 50-year anniversary - The Golden Web Show, although not a show winner, is my favorite bag. I think it’s the cool colors of blues and greys that I’m drawn to with it. What was special about this bag was that my mom and I had a girl’s weekend with a blending board. As a member of the Weaver’s Guild of Buffalo, she could barrow the guild’s blending board which is one of the many benefits of being a member. I went home to Buffalo one weekend and my mom borrowed the blending board and we set it up in the living room so we could be comfortable while working. My mother knew how to use the blending board and taught me how to put the wool on and roll it off into a rolag. She was a spinner, so she would take a rolag and spin it into yarn. But I was going to take it and add it as the last layer on felt hats and bags. It was fun to have a glass of wine with my mom and talk as I was mixing all the fibers together. Sometimes its just nice to have a weekend with your mom. Every time I see a piece made with this mix; I think of the fun we had making the mix together.

Hanging in the cool color section of The Golden Web Show.
This was not my first bag so by the time I made this I was feeling comfortable with making 3D objects in wool with a resist. The mix is hand blended blue shades of merino wool, purple and orange tussah silk, silver rock waste silk, black recycled sari silk, carbon bamboo, and grey felting curly wool locks mixed together with the blending board. The mix was 75 percent different shades of blue wool and 25 percent cellulose/silk mix. I did a little research online and read that you should mix the other types of fiber in-between the layers of wool. I started by laying across the blending board a layer of the tussah silk and then adding layer a layer of the blue merino wool, continuing until all the different silks were combined. Then I added the bamboo in-between layers of wool and finally the curly wool. You can see the process in the video below.
Making of a Felt Bag
The mix was the final layer of the bags layout so now I’m going to walk you through how the bag was constructed. To start you must cut the resist out of a material the fibers cannot pass through because you are making three sides of the piece all in one – front, back, and bottom. I also made a flap but it is just a flat piece that folds over the 3D form. I use the material that they use to insulate between wood floor boards when they ship them. Its thin and easy to work with. You can make a resist from cardboard. The drawback to using cardboard is that it’s only a one-time resist which seems a waste. To preserve the cardboard, you can wrap duct tape around it to make it waterproof. I’ve never done that because I had this thin insulation material.

Layout with resist.
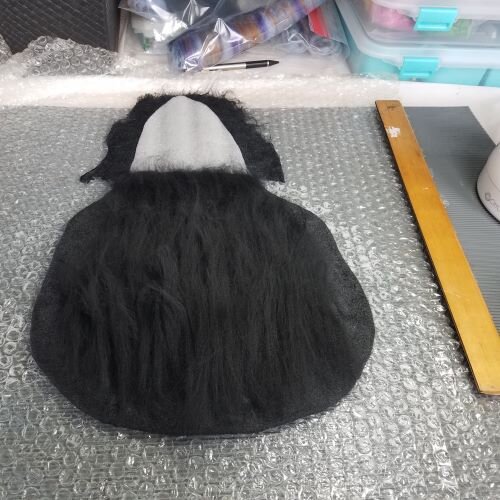
I did not design the resist, I bought the pattern on Etsy. I am currently taking another Fiona Duthie class on bag creation and have learned how to design the resist for different types of bags. Season two will go into the original pieces I created from my own resist designs. For now, you see in the picture above that I have laid one layer of black merino wool on the resist and turned it over. A wet felted bag is a seamless bag. You see that I laid wool over the edge of the resist by about an inch or more. In the pictures below you can see how I took the wool that was over the edge and folded it over on the base of the bag. I left the wool that’s over the edge of the flap alone. At this point I’m focused on the base of the bag.

Backside with wool of inside layer folded under the resist.

Front side with wool folded over the resist from the backside.
As you can see in the picture below, the bag now has two perpendicular layers of black wool laid out around the entire resist which forms the inside of the bag. A bag will have four layers of wool. Each layer of wool is perpendicular to the layer before it. The four layers of wool make the bag strong enough to hold objects. You want to check to see after you have laid the inner layer if there are any holes or thin spots in the wool base. At this stage you can fix them by laying more wool down. You want to really inspect the edge of the bag that you folded over. You don’t want to miss if any wool that was folded over has a very thin spot or a hole. After you have inspected the first two layers you lay down your third and fourth layer of wool, in this case it’s the cellulose/silk mix. You see in the following pictures that I have laid down the mix on the front side of the bag and laid the mix over the edge. You see in the next picture that I folded the mix under the bag. The extra wool around the flap is still left unfolded at this point.
Frontside finished with inside layer of bag.
At this point in the bag layout you focus in on the flap. With this type of bag resist the flap was included in the cutout. Often it is not, and you lay it out across the back of the bag on the bubble wrap where you marked the shape or put the shape under the bubble wrap (my preferred method) and lay the wool within the lines. With the bag flipped over I lay the final two layers of the mix on the back of the bag and flap. The edge of the pointy flap was constructed by a wet felting technique of folding over an extra flap of wool that was used for the inside of the bag. I did this by cutting the overlaid wool with scissors in a straight line before I folded it back on itself over the top of the flap. Basically, taking the wool that was extended beyond the resist and folding it over to create a crisp flat edge. You see in the pictures following how I have now created a black border around the edge of the flap. The underside of the flap is black like the inside of the bag, but the mix has a border going around it on the flap.


I picked fun fibers and colors that I wanted to highlight out of the mix as I was laying out the final two layers and put them to the side. I played around with where to put the black recycled sari silk. Because it is waste silk from a textile factory it is all tangled up. I did not try to smooth it out or untangle it during the mixing because I wanted large globs of the silk to create smooth texture around the bag. I moved the glob of black recycled sari silk around along with the orange and purple tussah silk until I created an organic pattern that I liked. This is not a planned-out design with the mix. It is completely organic except for the nice pieces I put aside to highlight on the flap.

Close up of pointy flap.
After the bag was all laid out, I laid a piece of bubble wrap on top of the wet and soapy wool and began to rub it with my palm-washboard to start the felting process. After I was done rubbing it, I rolled it on the outside and then when it was combined enough that the resist starts to fold in, I turned it inside out. I rolled the bag while it was inside out just as much as I rolled the outside. You want to also, after the resist is out, smooth the edges of the bag with your hands. At this point a crinkle will have started to form around the edge and you need to rub it with you fingers to smooth that rumple out. Fulling a bag can take a long time depending on the size. Since this is a small bag it didn’t take too long. You can see the shrinkage in one of the following photos.


After the fulling is done and you have rinsed and stretched your bag, you then shape the it. With this bag I stuffed it full of bubble wrap to give it a sphere shape. In my other bag I made an inside pocket and will talk about that in next week’s post. This bag is very small and stylish, and I wanted to focus on the new bag pattern, so I left that out. After the bag is complete, I still needed a strap for it. To make a felt cord you just need to lay out three inches deep of wool for as long and your want the final cord to be. You lay three layers of wool out, each layer perpendicular to the last layer. Then you slowly roll up the wool into a cord and roll it under your palms between two pieces of bubble wrap. You roll until the cord is very solid and can’t pull apart. You full it like any other felt piece. Throw it, ball it up, and stretch it so that the wool is even across the whole cord. Felt cords are very easy to make.

Shaped.
To finish I needed to attach the cord to the base. For this bag I liked having the strap come out from inside the bag framing the flap between the cord. I turned the finished bag inside out and laid three inches of the cord down the side and stitched it in. I won’t lie, it is tedious to stitch it in which is why I choose a different method on the next bag. I also added a magnetic clasp hand sewn on to the underside of the flap that folds over to securely close the bag.

Dried
I still have a lot of the mix so I will be making more bags with it! I love this bag, so I don’t want to sell it, but I plan on making more because I have some interested customers who really want to buy this bag. There will be more pieces to come from my fun girl’s weekend trip with my mom!

Dried.
Housekeeping
Next week will be the last post of Season One. It will be about my award winning - Brown Marble Bag. I won the novice award for this piece because I had just started felting when I created this bag which has some interesting over the edge techniques included. Unfortunately, I did not take pictures at the time, so I constructed a new bag using the same techniques and photographed that for this posting. I added some additional techniques learned in surface design. I couldn’t help myself I love surface design! So, check back next week to see what was created.
Make sure to follow me on Facebook, Pinterest or Instagram to get my behind-the-scenes posts that take you into my studio. Also, please leave comments or questions below or on any of my social media channels. I want to hear from you and get a discussion going.


